2.28.2013

Banana Ginger Scones

So, I'll be honest. I made these scones a couple of weeks ago....and then kept forgetting to take pictures of the finished product.


I finally remembered as the very last scone was about to be consumed. It was delicious - so it served it's purpose.


When I told my mom I was making these scones she was a bit jealous. Her response over the phone: "I want one!!!" She and I are a scone-loving pair. Imagine my grief-stricken scone-loving self when told I should remove gluten from my diet.


Yikes.


This was my first attempt at scones since going gluten-free. I've been getting ever more adventurous with my baking. Gluten-free flours and the elusive xanthan gum are no longer my enemies. Thank. God.


When I decided to play around with these puppies, it was all because of a pair of very lonely, VERY overripe bananas sitting in my fruit bowl. My husband has a secret (okay, maybe not so secret) love affair with banana bread. But banana bread is old hat. I wanted something new. And I was craving scones. So I gave him the choice: banana bread or banana scones.... Then swayed him in my direction.


I love the bites of sweetened spiciness that the bits of ginger add to these scones. But I'm a ginger fanatic anyway. I chew on pieces of ginger after lunch and dinner and to help settle my stomach when I'm experiencing indigestion. Best trick ever.


You could make these scones with regular all-purpose flour. It actually works out to be about the same amount as the gluten-free flour, which is typically not the case, but true here. Use any kind of milk you like - I used dairy free - or swap out the butter for margarine or shortening. You can definitely use plain, unsweetened yogurt. In that case I would recommend increasing the amount of added sugar by 1 Tbsp or so. These are not quite as crumbly as traditional gluten scones, but I kind of liked them that way. I could toss them in my toaster oven and not worry about them falling apart!


Play around with these! If you don't like ginger, I won't be offended. Use cinnamon, chocolate chips, or dried fruit. That's the beautiful thing about scones - they don't discriminate. And they pretty much always taste good!


Banana Ginger Scones

Prep Time: 15 minutes (+ 30-60 minutes chilling time)
Cook Time: 30 minutes
Yield: 8 scones
  • 2 large Bananas, very ripe - peeled and mashed thoroughly with a fork
  • 2-4 Tbsp Unsweetened Almond Milk (or any other milk - if using cow's milk, I recommend 2%)
  • 6 oz container Vanilla Non-Fat Yogurt (Stonyfield is a great choice!)
  • 12.5 oz Gluten-Free Flour Blend (a scant 3 cups)
  • 3 Tbsp Sugar
  • 2 tsp Baking Powder
  • 1/2 tsp Xanthan Gum
  • 1/2 tsp Salt
  • 1 tsp Ground Ginger
  • 4 Tbsp Light Butter, chilled
  • 1/3 cup finely chopped Crystallized Ginger
  • Turbinado Sugar, for sprinkling
  1. Place the mashed bananas into a 1-cup measure. Add enough milk to equal 1-cup, if necessary. If the mashed bananas equal 1-cup alone, then do not add any milk. Pour bananas and milk into a small mixing bowl, add yogurt and stir to combine; set aside.
  2. In a medium mixing bowl, sift or whisk together dry ingredients: flour, sugar, baking powder, xanthan gum, salt, and ground ginger.
  3. Break butter into small chunks. Add to dry ingredients and cut in with a fork, your fingers, or a pastry blender, until mixture is coarse and crumbly.
  4. Add wet ingredients to dry ingredients and stir until ingredients have come together. Dough should be wet and very sticky.
  5. Turn dough out onto a sheet of parchment or wax paper and form into a disc - about the size of a dinner plate. Cover with another piece of wax paper and wrap tightly. Place in the freezer for at least 30 minutes. This will allow the butter to firm up.
  6. Preheat the oven to 400°F. Once the dough has set, remove it from the freezer and remove the top piece of wax paper. Flip over onto a baking sheet lined with a Silpat or parchment paper and remove the second piece of wax paper. Cut the dough into 8 wedges and push them apart slightly, so they have some room to spread when they bake. Sprinkle each wedge generously with Turbinado sugar.
  7. Bake scones for 30 minutes, or until they have turned golden brown and are firm to the touch. Remove from oven and allow to cool completely on the baking sheet. Or enjoy while still warm with butter or jam and tea!
*Adapted from theKitchn*


Happy gluten-free baking!


2.11.2013

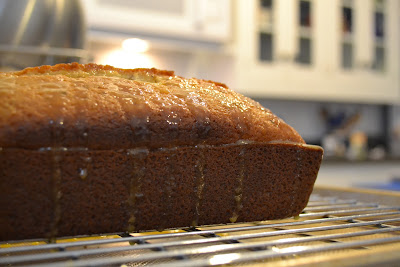
Poppyseed Cake with Orange Glaze

The other week I found myself having a serious craving for my mother's poppyseed cake. 


Problem: Original recipe is not gluten free.

Solution: Make it gluten free...and pray that it turns out half as good as the original...


This tea bread is the stuff of legend my friends. No lie. It's incredible and it was one of my favorite treats when I was growing up.


It's not your standard, run-of-the-mill, lemon poppyseed cake. In fact, there's no lemon in it at all. Hence the lack of "lemon" in the name of this delightful concoction. The citrus flavor comes completely and wholly from the glaze - a heavenly blend of either frozen lemonade or orange juice concentrate, almond and vanilla extracts, and powdered confectioner's sugar.


The glaze is poured on top of this beauty while it's still warm, which allows the cake to soak up the sweetness and flavors. Making this the moistest, most delicious gluten-free tea bread you have ever encountered. Promise.


This cake brings back so many wonderful memories from my childhood. I think my mother may have made this more often than banana or zucchini bread - although we did eat our fair share of zucchini bread, particularly during the summers when our garden was overflowing with it. But we'll save that recipe for another time...


When I was transposing this recipe, I had to cut it in half. The original made a double loaf batch. Unfortunately, I misread the amount of poppy seeds and added 3/4 tsp instead of 3/4 Tbsp. Needless to say, there weren't quite enough poppy seeds in the loaf I made while testing this recipe. Don't make the same mistake I did. However, if you do mistakenly add too few, it will still taste delicious.

I sincerely hope that you enjoy this recipe as much as I do. It was actually pure luck that it turned out perfect the first time around - and I'm so glad it did!


Poppyseed Cake with Orange Glaze

Prep Time: 15 minutes
Cook Time: 1 hour (+ cooling)
  • 1 large Egg
  • 1 large Egg White
  • 1 cup Sugar
  • 2/3 cup Vegetable Oil
  • 2/3 cup Fat-free Milk
  • 7.5 oz Gluten-free Flour blend
  • 3/4 tsp Baking Powder
  • 3/4 tsp Salt
  • 1/2 tsp Xanthan Gum
  • 3/4 Tbsp Poppy Seeds
  • 1 tsp Almond Extract
Glaze:
  • 2 Tbsp frozen Orange Juice Concentrate, thawed (or frozen Lemonade Concentrate)
  • 1/4 tsp Vanilla Extract
  • 1/2 tsp Almond Extract
  • 1/3 cup + 1 Tbsp Confectioners (Powdered) Sugar
  1. Preheat your oven to 350°F. Grease a standard loaf pan with cooking spray and set aside.
  2. In a large bowl, beat together the following ingredients: egg, egg white, sugar, vegetable oil, and milk.
  3. Sift together flour, baking powder, salt, and xanthan gum. Add to wet ingredients and whisk together until well combined.
  4. Stir in poppy seeds and almond extract.
  5. Pour batter into loaf pan and bake in preheated oven for 1 hour, or until a toothpick inserted into the center of the loaf comes out clean.
  6. Turn out onto a cooling rack placed on top of a rimmed baking sheet, lined with a Silpat or parchment paper if desired.
  7. Prepare glaze by whisking together juice concentrate, almond extract, vanilla extract, and powdered sugar in a small bowl. Drizzle glaze over top of cake with a spoon while it is still warm - this will allow the cake to soak up the glaze. Allow cake to cool completely before serving.
Nutrition per Serving (Based on 12 slices): 271 Calories; 13g Fat; 1g Saturated Fat; 36g Carbohydrate; 0g Fiber; 3g Protein


Happy gluten-free baking!


2.02.2013

Honey Cinnamon Peanut Butter

We go through A LOT of peanut butter in my house.


And when I say a lot, I mean a lot. My husband is practically addicted to the stuff. So much so that he once asked me, "If we ever have a child with a peanut allergy, can we send them back?"


No joke.


A few months ago I decided I would try to start making peanut butter myself - hoping it might be more cost effective. And I mean, come on, it couldn't possibly be that hard. I only purchase natural peanut butter, which can get mighty pricey. Especially the way my husband goes through it - I buy a new jar at least every other week if not sooner. And that's really all him, I don't partake much in the peanut butter eating. He puts it on everything from oatmeal to bagels.


Yeah, I think the oatmeal thing is kinda weird too...


Regardless, making peanut butter really is not that challenging, as long as you have a good food processor and a lot of patience. Buying peanuts that are already roasted but still in the shell is a bit cheaper (you can purchase a 3-pound bag for between $5-$7, which will yield about 5 half-pint jars of peanut butter). But if you're looking to save yourself the 30-45 minutes of shelling and skinning 1 pound of these slippery little suckers - I would recommend buying a container of dry roasted, unsalted peanuts that are already naked.


This recipe is flavored with a bit of cinnamon and some honey - if you like your peanut butter unsweetened, you could certainly leave out the honey. If you like it sweeter, add more honey to taste. You could also leave out the cinnamon and just have plain peanut butter. It's delicious either way. Promise.

Honey Cinnamon Peanut Butter

Prep Time: 30-40 minutes
  • 15 oz Roasted Peanuts, shelled and skinned (don't weigh them in the shells first, weigh them after they've been shelled, or you'll end up with too few)
  • 2 tsp Honey
  • 1 tsp Kosher Salt
  • 2-3 Tbsp Peanut Oil
  • 3/4 tsp ground Cinnamon
  1. Measure out 1/2 cup of peanuts and set aside. Reserving these until the end will result in a chunky peanut butter. For smoother peanut butter, skip this step and place all of the peanuts in the food processor and begin with Step 2.
  2. Place remainder of peanuts, honey, and salt in the bowl of a food processor. Process continually for about 1-minute.
  3. Scrape down the sides of the bowl and replace lid. Turn processor on and slowly pour in 2 Tbsp of peanut oil - allowing processor to continue to run until the butter is smooth.
  4. Scrape down the sides of the bowl again and add the cinnamon. Process until combined, 1 1/2 - 2 minutes. If the nut butter looks dry or is not coming together, add more peanut oil 1/2 Tbsp at a time. Pour in while processor is running, as before, until butter comes together and resembles the consistency of store-bought peanut butter. Peanut butter should have an oily sheen and be spreadable, but not too runny.
  5. Add the reserved 1/2 cup of peanuts and pulse until slightly broken down and combined, 10-12 times.
  6. Spoon into mason jars or another air-tight container. Will keep in the refrigerator for up to 2 months - although I don't think it will last that long!

*Adapted from: Alton Brown*


~ NOTE: To cut down on overall prep time, use peanuts that have already been shelled/skinned. I would recommend dry-roasted peanuts that are unsalted.


Happy gluten-free cooking!